RICON West 2013 Talk Writeup
So, last Thursday I gave a talk in San Francisco at RICON West. As I didn’t get to cover everything in the talk I decided to do a writeup with some more detail (and less swearing, sorry about that).
First of all, I am not a security expert, these are just my opinions and thoughts on a bunch of very complicated topics. You should supplement this with your own research. I’ll provide some useful links at the end.
Some of the things I didn’t cover in the talk, but that arguably fall under the umbrella of security:
- Securing intra-cluster communication - This is something we used to have, although it was cumbersome to configure. We plan to re-introduce this after 2.0.
- Encrypting the data stored in Riak - Doing this at the database level doesn’t make a lot of sense, to serve reads, the database would have to be able to decrypt the data to return it to the client. It really makes more sense to encrypt data, if you really feel the need to, at the client side.
- Capabilities VS ACLs - This is a bit of a contentious issue. We decided to go with ACLs because they’re more familiar to people used to administrating databases and there’s fewer issues around issuing/revoking them.
- Multi-tenancy - While data isolation does provide some of the foundations for building a multi-tenant database, it does not address the ‘noisy neighbour’ problem or the question of quotas.
- Cool distributed systems stuff - Basically I just leaned on riak_core for most of that, especially the new cluster metadata stuff Jordan West added for Riak 2.0.
Since we’re not talking about any of the above, what are we covering? The real focus of the work is to secure client<->Riak communications. Now, as my friend Ryan Zezeski at Basho likes to say, “security is a farce” and, to some extent, he is correct. Security is really about raising the bar high enough that you’re not trivial to compromise. There are always weak links, and some of them you just can’t fix with technology, like social engineering. This work is just aiming to raise the security bar for Riak from lying on the ground to be comparable to its competition.
For a long time, the party line at Basho was “Riak doesn’t need security”, and that any needed security could be added at the network level, either via network architecture or firewalling off Riak from the internet. Another popular way to deploy Riak was to build a Riak-backed API server and make all the clients go through that API server and isolate Riak from raw client input.
There’s nothing wrong with any of that, of course, but it doesn’t provide the same level of security as the above methods plus a database with the concept of built in security. The above approaches don’t necessarily address the issues of man-in-the-middle (MITM) attacks, compromised clients or audit trails. To properly secure your data, Riak really needs to know about users and what a particular user can do. This way unintended data access can be prevented and reported on, assuming you grant your users only the permissions they need.
Security, in my view at least, is really composed of 4 pieces: encryption, authentication, authorization and auditing. You can’t securely communicate with a server without encryption, you need to authenticate with the database to figure out what you’re authorized to do, and finally, there should be an audit trail for every action so if an intrusion does happen, you can see what the intruder did.
Let’s cover the 4 pieces in more detail, with a view to the implementation in Riak. First up is encryption.
Encryption
So, the ‘industry standard’ for encryption is, as you might expect, that old chestnut SSL/TLS. A lot of people I’ve talked to proclaim they “don’t undertstand SSL” so I’m going to go over the basics.
SSL (Secure Socket Layer) originated at Netscape in the mid nineties. The original SSL 1.0 was never released. 2.0. released in 1995, was quickly discovered to be flawed. 1996 saw the release of SSL 3.0 which is still common today, althouch considered weak by modern standards.
In 1999 TLS (Transport Layer Security) 1.0 was released, it was backwards incompatible with SSL 3.0, which is presumably why they changed the name. TLS 1.1 came out in 2006, and the main highlight was protection against some of the CBC (Chained Block Cipher) attacks against SSL 3.0 and TLS 1.0. The BEAST attack is a good example of this kind of attack. Finally, TLS 1.2 was released in 2008 and mainly tweaks the ciphers used and adds some more flexibility to the TLS handshake.
Unfortunately, most of the internet still runs on SSL 3.0 and TLS 1.0. 99+% still support the older protocols and less than 20% support TLS 1.1 or 1.2.
Related (or responsible for that) is that the popular TLS implementations have lagged behind the standard for a long time. OpenSSL only gained support for TLS 1.1 and 1.2 in 1.0.0, released in 2013. GNUTLS really led the pack, implementing TLS 1.2 before the standard was even finalized, and enabling it by default (I think) sometime around 2.9.9 in 2009. NSS, the Mozilla implementation, also only gained TLS 1.2 support in 2013, with version 3.15.1.
And this trickles down to programming languages, too: Ruby 2.0.0 in 2013 saw the implementation of TLS 1.2 (if the system’s OpenSSL supports it), Java 7 implemented TLS 1.2 in 2011 (which is creditable), Erlang gained support in 2013 as well with the release of R16B and Python 3.4, expected before the end of 2013 will have support as well (although there is a python-gnutls binding you can use instead).
Web browsers also saw a similar progression. Chrome 30, Firefox 28 (not generally released at the time of this writing). Internet Explorer 11, Opera 17 and Safari 7 all implement TLS 1.2 and have it enabled by default. ALL of these (with the exception of Firefox 28 which looks like it will release in early 2014) were released in 2013.
So, one bright note is that we’re finally, as of November 2013, living in a world of 2006 state-of-the-art encryption.
Now that we’ve covered the myriad of SSL/TLS flavors, let’s talk about how the TLS handshake works, at the high level:
- The client sends a Hello message indicating the highest TLS version it supports, a random number and the cipher suites it supports.
- The server responds with its own Hello message, telling the client what version of TLS will be used, another random number and the cipher suite the server has chosen.
- The server will also send, if using PKI, its public key.
- The client sends, again depending on the key exchange protocol, a pre-master secret it has generated, encrypted with the server’s public key. It may also send its own private key, if the client is using certificates as well.
- The client and the server now use the shared information to generate some new encryption keys.
- The connection switches into encrypted mode, using the new keys.
For a more detailed explanation, Wikipedia has a good writeup.
There’s actually various ways key exchange can work: it can be completely anonymous, it can use some kind of shared secret (PSK, SRP) or it can use a Public Key Infrastructure (PKI). The latter is the most common, as it is how HTTPS work. Anonymous exchanges are vulnerable to MITM attacks, so they are illegal in TLS 1.2.
Pre-Shared Key (PSK) and Secure Remote Password (SRP) are both variations on the idea that both the server and client share some secret information, like a user/password combo. Using that shared secret they can bootstrap a secure connection because they don’t have to exchange the secure information over the wire, just derivatives of it, which you’d need the original to be able to verify/decrypt. The main downfall of these approaches is that if the secured secret is compromised a client can masquerade as a server and vice versa. SRP actually ensures that the server stores a ‘verifier’, which is a derivation of the password, not the actual password, so it is harder. Unfortunately, the flavor of SRP used in TLS-SRP uses 2 rounds of SHA1 as the hashing mechanism, which doesn’t really stand up to modern brute forcing attacks using GPUs and the like.
Public key cryptography works on the idea that every server (and sometimes client) has an asymmetric public/private key pair. Data encrypted by a public key, which is freely distributed, can only be decrypted by using the private key, which is kept secret. Conversely, data can be ‘signed’ using the private key and that signature can be verified using the public key. The properties of this enable the implementation of Public Key Infrastructure (PKI) key exchange.
In PKI, the server has a public/private key pair, signed directly or indirectly by some trusted third party, the Certificate Authority (CA). The chain of ‘intermediate’ CAs can be quite long, and 3-4 is not uncommon. Operating systems and browsers often include a default bundle of ‘trusted’ root CAs, of which now there are about 650. That is a lot of people to trust, given that some of the ‘intermediates’ can also sign CAs. In the past this has caused a lot of problems when a CA is compromised, or just plain goes rogue and does things like sign certificates for google or paypal and starts MITM attacking users using those services. Some browsers, notably Chrome, support ‘certificate pinning’ where the browser ships with a list of certificates for certain domains, if you see an apparently valid certificate for that domain, but it doesn’t match your database, you know you’re being attacked.
However, for connecting to Riak, there’s no reason to trust all 650+ of these CAs, the client should know what CA the server is using and should require the server use only that CA. This isolates you from the ‘trusted’ CAs doing dodgy things and also lets you easily run your own CA (which is what I’d recommend anyway).
So, once you’ve actually connected to a TLS server, the server will send you the client certificate along with any intermediate certificates and sometimes even the root CA. Then you have to verify that the CA chain is complete from the peer certificate back to a root CA you trust, not just whatever the server provides as the root CA. You also have to verify that all the CA certificates in the chain are allowed to sign certificates. Back in the days of early SSL, some implementations only checked the chain was validly signed but not that all certificates in the chain were allowed to sign certificates themselves. So, you could buy a certificate for your own domain name and then use that certificate as a CA certificate to sign your own certificate for paypal.com and MITM people with it. The final check that needs to be done is to check all the certificates are not expired and revoked. Here’s an image of what a certificate chain looks like:
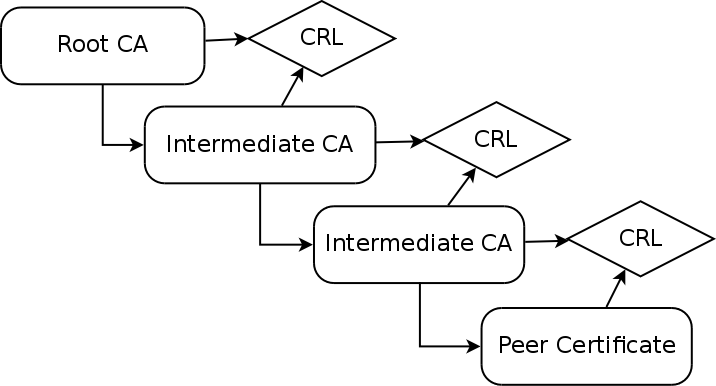
As you can see, each CA maintains a Certificate Revocation List (CRL), which is a cryptographically signed list of revoked certificates, and each certificate for that CA contains a reference to a URI where its CRL can be obtained. The CRL is (usually) signed by the CA so you can trust its validity and it contains information on how long the particular instance of the CRL is valid. The root CA obviously has no CRL for itself; Quis custodiet ipsos custodes?
Now, compared to PSK or SRP, this PKI thing is a clearly lot more work. Why bother with it? There’s a few reasons: Clients can’t masquerade as servers. or vise versa if one is compromised, CRLs let you centrally revoke a certificate if it is compromised and with PKI there’s meaningful identity information attached.
Authentication
After that somewhat lengthy segue, we can move onto authentication and start getting a little more in-depth with Riak’s implementation.
Authentication in Riak 2.0 is heavily inspired by PostgreSQL. Postgres’ authentication model isn’t exactly the easiest to use, but it does provide a lot of flexibility. I’ve borrowed a lot of ideas while hopefully smoothing over some of the smooth edges and legacy choices.
Riak borrows the ideas of ‘roles’ from Postgres, all users and groups are roles and roles may be members of other roles. You can add roles like this:
riak-admin security add-user andrew
riak-admin security add-user greg password=1234
Now that you have a user, you have to tell Riak how they can authenticate. Riak 2.0 supports the following authentication methods:
- Trust - Don’t require a password, trust the user. Most appropriate for development or for clients on a trusted network.
- Password - Check user’s password against a PBKDF2 hashed password, stored in Riak.
- PAM - PAM almost has a backend for everything, so this provides a lot of flexibility.
- Certificate authentication - Client sends a certificate signed by the same CA as the server’s and the certificate’s common name must match the username.
An authentication source tells Riak that for certain users, coming from a particular CIDR network a particular authentication source is required. Examples of adding authentication sources:
riak-admin security add-source all 127.0.0.1/32 trust
Trusts any user connecting from localhost.
riak-admin security add-source andrew,greg 10.0.0.0/24 password
Require a password for andrew and greg when they connect from the 10.0.0.0 class C network.
riak-admin security add-source all 0.0.0.0/0 pam service=login
Everybody else must use PAM authentication, via the ‘login’ service.
Authentication sources are sorted by Riak, most specific first, but only the first matching source is tested. So if ‘andrew’, connecting from 10.0.0.24 failed to authenticate via Riak’s password database, Riak would not retry the authentication against PAM.
If you want to make one role a member of another, you can use the roles user attribute:
riak-admin security add-user dev
riak-admin security add-user ops
riak-admin security add-user andrew roles=dev,ops
Authorization
Riak continues the trend of borrowing ideas from Postgres when it comes to the ACL management. Riak core applications register the permissions they wish to expose as part of the riak_core:register() call. Those permissions are prefixed by the name of the riak_core app, so if riak_kv registers the ‘get’ permission, it becomes the riak_kv.get permission. This ensures that permissions will not conflict across cooexisting riak_core applications on the same node/cluster.
All API endpoints indicate what ACL(s) they require. You can see examples in the HTTP and PB APIs.
To add/remove permissions from a user, there are grant/revoke commands:
riak-admin security grant riak_kv.get,riak_kv.put ON default mybucket TO andrew
riak-admin security revoke riak_kv.put ON default mybucket FROM andrew
Now, if you’re wondering what the ‘default’ in the above examples is, it is a Bucket Type,. The ‘default’ bucket type is where any data in a Riak cluster lives that isn’t under a specific bucket type. So if you upgrade an existing Riak cluster, all your data will live in buckets under the ‘default’ bucket type. I suggest you read the above link and the links it links to for more information.
Assuming you’ve created your own bucket type, you can then grant/revoke on that bucket type:
riak-admin security grant riak_kv.get ON mytype mybucket TO andrew
In this case, we only grant a permission on a bucket type AND bucket, the request must match both to be granted by this ACL.
riak-admin security grant riak_kv.put ON mytype TO andrew
Now this grant is a little different. We’re granting on the whole bucket type at once, such that any bucket under that bucket type will satisfy the ACL. This can be handy if your application needs to dynamically create buckets, but you still want to have separate ACL rules for different parts of your data.
riak-admin security grant riak_kv.delete ON ANY to andrew
This is the big hammer, ignore bucket type and bucket and just let the user delete anything. I wouldn’t recommend this for most things, but it can be helpful in certain cases, like retrofitting security onto a legacy Riak client application, perhaps.
Riak’s command line tool riak-admin also includes support for inspecting the users, authentication sources and grants:
riak-admin security print-users
+----------+---------------+----------------------------------------+------------------------------+
| username |     roles     |                password                |           options            |
+----------+---------------+----------------------------------------+------------------------------+
|  admins  |               |                                        |              []              |
|  andrew  |    admins     |ceb61f466f89ac0c866460ef27b7ee8fd7dd9dd1|              []              |
+----------+---------------+----------------------------------------+------------------------------+
riak-admin security print-sources
Note that there is a bug in the tech preview with this command, it’ll crash if any user is a member of any roles. Sorry.
+--------------------+------------+----------+----------+
|       users        |    cidr    |  source  | options  |
+--------------------+------------+----------+----------+
|        all         |127.0.0.1/32|  trust   |    []    |
|        all         | 0.0.0.0/0  | password |    []    |
+--------------------+------------+----------+----------+
riak-admin security print-user andrew
Inherited permissions

+--------------------+----------+----------+----------------------------------------+
|        role        |   type   |  bucket  |                 grants                 |
+--------------------+----------+----------+----------------------------------------+
|       admins       |    *     |    *     |          riak_kv.list_buckets          |
|       admins       | default  |    *     |              riak_kv.get               |
+--------------------+----------+----------+----------------------------------------+

Applied permissions

+----------+----------+----------------------------------------+
|   type   |  bucket  |                 grants                 |
+----------+----------+----------------------------------------+
|    *     |    *     |          riak_kv.list_buckets          |
| default  |  users   |              riak_kv.put               |
| default  |    *     |              riak_kv.get               |
+----------+----------+----------------------------------------+
As you can see, because ‘andrew’ is a member of the ‘admins’ role he inherits the permissions from that role, which means that the applied permissions contain those permissions as well as any permissions he has himself.
Really, this is all pretty standard stuff, if you’re familiar with Postgres or, to a lesser extent, other ACL equipped databases. And really, that is about all there is to say on how to use it.
If you want to see an example of security in action there are sample HTTP and PB sessions.
There does remain some more work to do before 2.0 lands. Not everything I want to do for security will make it in, but expect future releases to improve upon what 2.0 will deliver. alter-user/source and del-source will be need to be added as well as some way to disable/deactivate users. There’s also some of the deeper, darker corners of the Riak API that don’t have corresponding ACLs. Finally, I would really like to tune the default TLS cipher list so we can ensure clients are using the best ciphers for the speed/security tradeoff.
This post is only actually about the first half of my talk, but it is running so long already I’m going to split the rest into a separate post that will mostly deal with the hurdles I encountered implementing all of this.